


1/6 F-105 Build Thread

The following users liked this post:
Viper1GJ (10-09-2020)
 10-09-2020, 03:46 PM
#777

Thread Starter
My Feedback: (20)
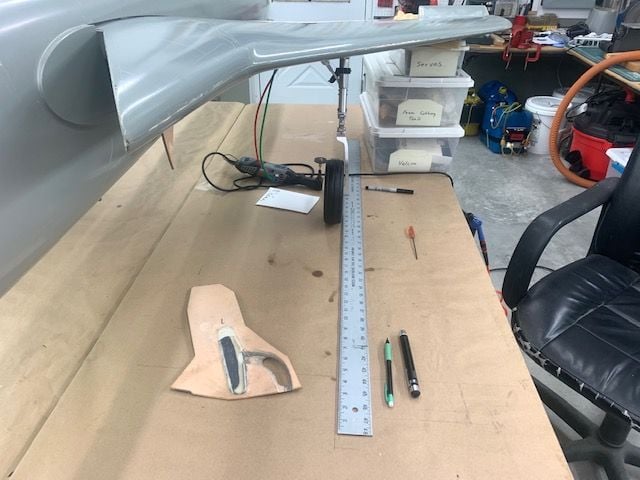
Electronics tray lay out
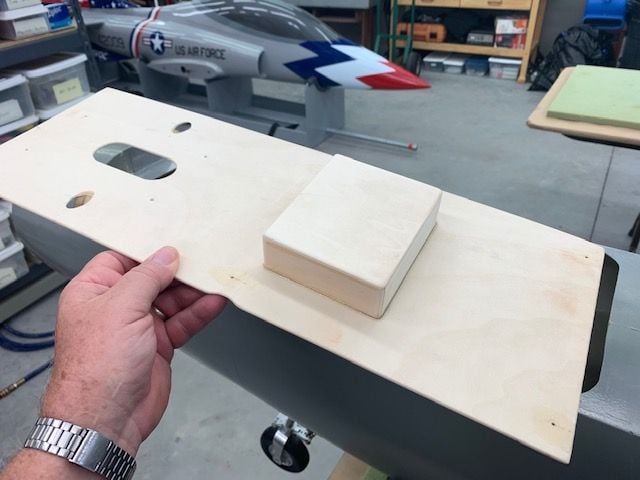
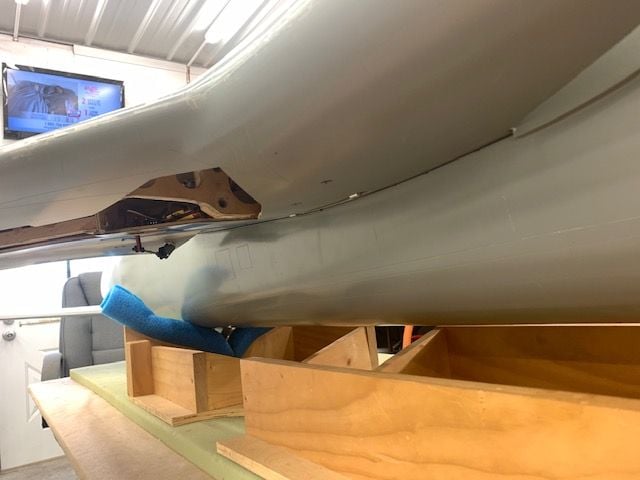
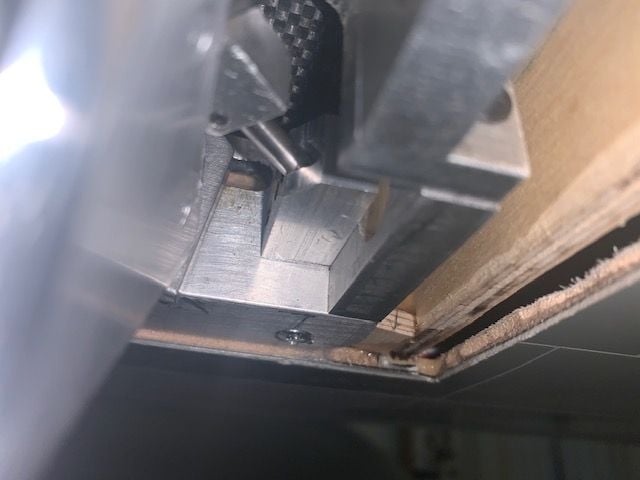
I finally got around to covering the nose gear retract relief hole on the electronics tray with a small bump up cover
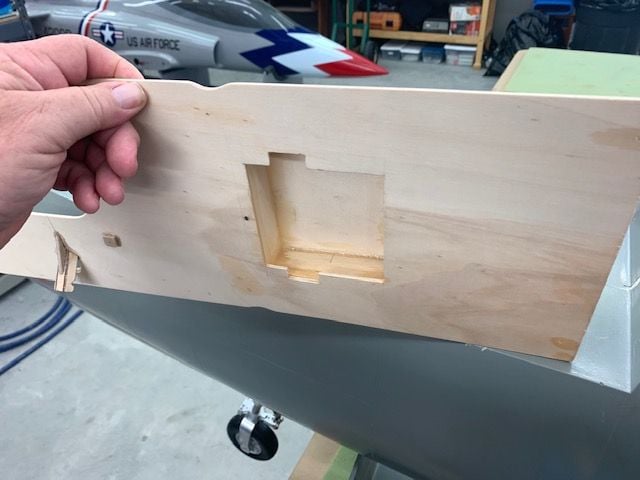
Bottom view

The cover gave me some more real estate on the tray so I modified the layout to mount the RC switch receiver on the cover

Updated and paired all three receivers to the transmitter and got the RC switch paired and connected to the CB400

Revised board layout. Stuff is mounted with masking tape for now since it will all have to be removed for painting the board later.
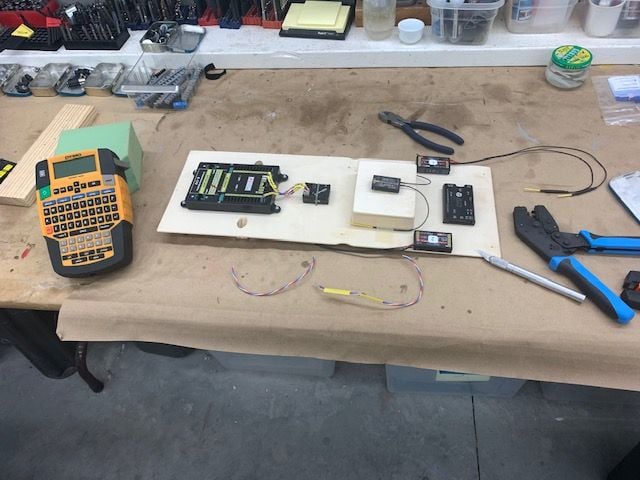
Another crimping and label session to make up the jumpers that will connect all the stuff
I finally got around to covering the nose gear retract relief hole on the electronics tray with a small bump up cover
Bottom view
The cover gave me some more real estate on the tray so I modified the layout to mount the RC switch receiver on the cover
Updated and paired all three receivers to the transmitter and got the RC switch paired and connected to the CB400
Revised board layout. Stuff is mounted with masking tape for now since it will all have to be removed for painting the board later.
Another crimping and label session to make up the jumpers that will connect all the stuff
10-10-2020, 04:25 PM
#778
Thread Starter
My Feedback: (20)
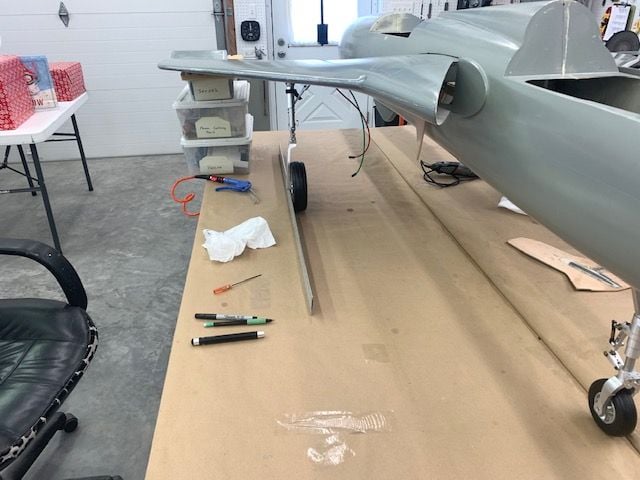
I finished the wire jumpers on the electronic tray. The first three jumpers in the photo above turned out to be too short so I replaced them and then finished the rest. I programmed the Cortex Pro, CTU, and all the radio functions possible with out actually hooking up the servos. I got the gear sequencer working and learned how to control all the gear doors from a single door sequencer and still have adjustable endpoints for each of the 4 gear door servos. Major breakthrough for me and the Jeti radio. The more I learn to do with the Jeti the better I like it. It is way far ahead of my previous 18MZ radio system.
I will have to go back and re program all the servo endpoints previously done because I changed the servo output mapping in the CB400. Also when setting up the drag chute Lua program I realized I forgot the Mrpm sensor on the main gear wheel. So I have to go back and install another wire in the servo harness for the Mrpm sensor. The Mrpm sensor is a safety interlock that Dave programmed to determine ground speed after landing to keep the chute from deploying in the air.
Someone mentioned mistakes before...still making them.
The following users liked this post:
jsnipes (10-10-2020)
10-11-2020, 03:10 PM
#779
Thread Starter
My Feedback: (20)
Adjusting endpoints

Finished the jumpers with labels on the electronics tray. Everything will get secured after painting the board. I installed the tray and started hooking up each servo one at a time using the servo wire harness cables to adjust each one. I learned the hard way not to plug in everything at once a few years ago when I smoked two high end flap servos that were binding while I was messing with something else. This was the first time I have had the entire system connected with the new servo cables I made. They all worked!
Chute jettison pin closed.

Chute jettison release pin open
Flaps down
Roll left

Roll right

Rudder left

Rudder right
Full up
Full down
Finished the jumpers with labels on the electronics tray. Everything will get secured after painting the board. I installed the tray and started hooking up each servo one at a time using the servo wire harness cables to adjust each one. I learned the hard way not to plug in everything at once a few years ago when I smoked two high end flap servos that were binding while I was messing with something else. This was the first time I have had the entire system connected with the new servo cables I made. They all worked!
Chute jettison pin closed.
Chute jettison release pin open
Flaps down
Roll left
Roll right
Rudder left
Rudder right
Full up
Full down
10-11-2020, 03:22 PM
#780
Thread Starter
My Feedback: (20)
Adjusting gear doors

Got both left and right main gear doors working with the sequencer. Door open
Door closed

Nose gear doors open

Nose gear doors closed. The printed CB400 mapping sheet was really helpful for finding the correct slot for each servo plug. The Jeti telemetry shows about .4 amps at idle with all the servos, CB400, Cortex Pro, 4 receivers, and CTU all plugged in.

The rats nest after everything plugged in for testing
Got both left and right main gear doors working with the sequencer. Door open
Door closed
Nose gear doors open
Nose gear doors closed. The printed CB400 mapping sheet was really helpful for finding the correct slot for each servo plug. The Jeti telemetry shows about .4 amps at idle with all the servos, CB400, Cortex Pro, 4 receivers, and CTU all plugged in.
The rats nest after everything plugged in for testing
10-11-2020, 03:33 PM
#781
Thread Starter
My Feedback: (20)
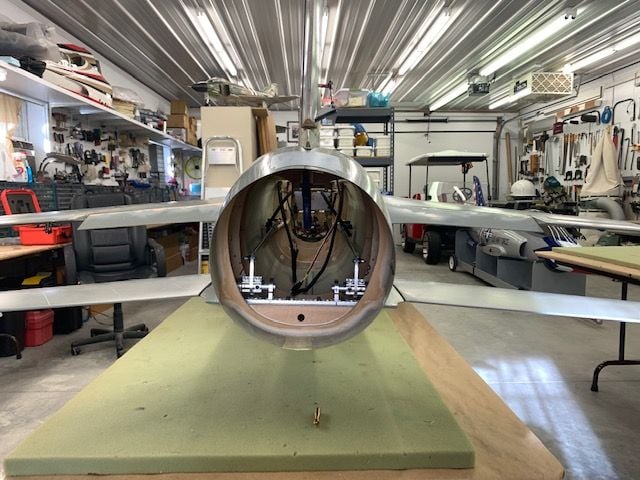
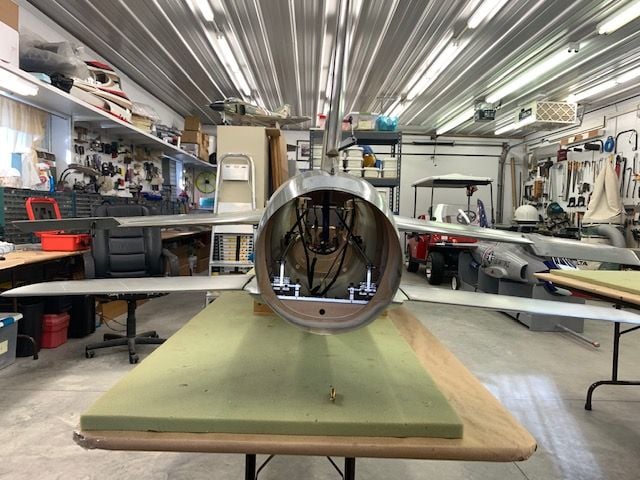
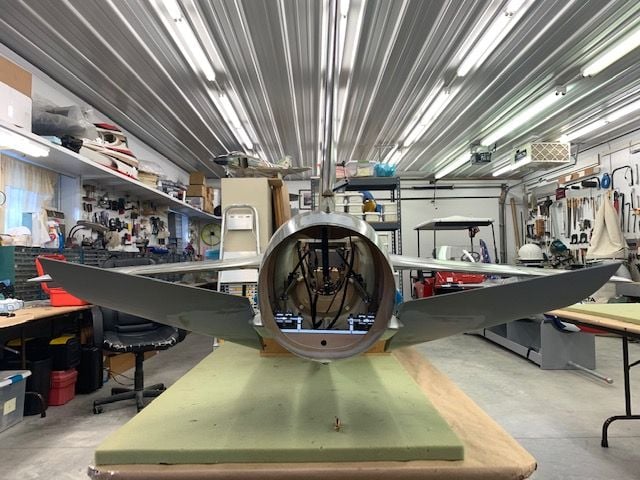
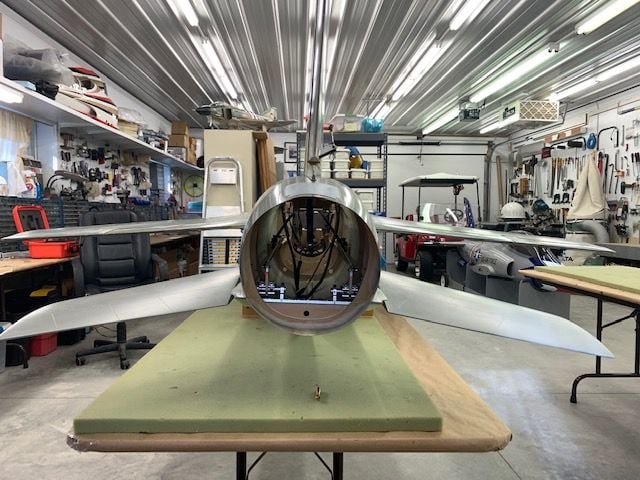
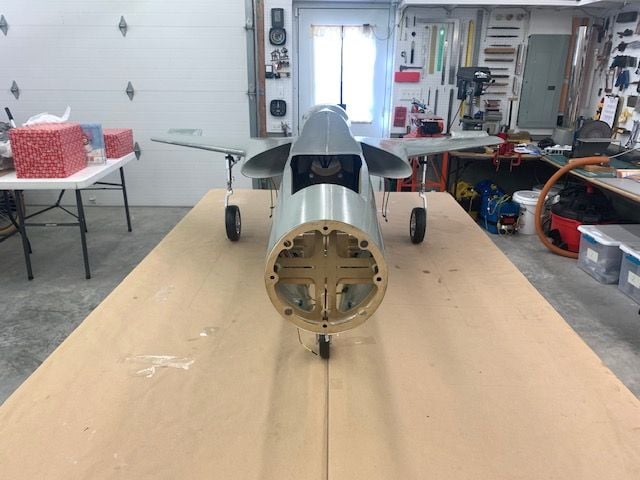
Motivation photos
Since most everything was together I decided to put the cockpit, nose, and tail on and just take a look.

It does look pretty cool!


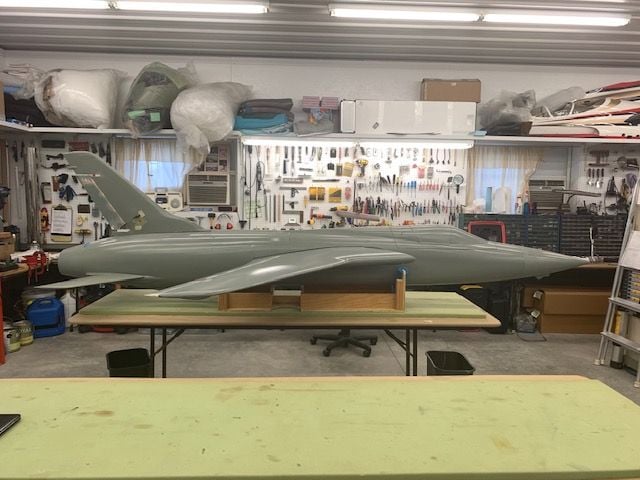
I thought that if I could just get the gear toe in rotation problem fixed I think I could see the end of the tunnel. Just after taking this photo Larry sent me email saying he has a plan to do just that by replacing a small part of the landing gear retract. Maybe it will all come together.
Since most everything was together I decided to put the cockpit, nose, and tail on and just take a look.
It does look pretty cool!
I thought that if I could just get the gear toe in rotation problem fixed I think I could see the end of the tunnel. Just after taking this photo Larry sent me email saying he has a plan to do just that by replacing a small part of the landing gear retract. Maybe it will all come together.
The following 2 users liked this post by Viper1GJ:
bonefishfool (10-11-2020),
jsnipes (10-11-2020)


The following users liked this post:
Viper1GJ (10-12-2020)
The following users liked this post:
skunkwurk (10-13-2020)


The following users liked this post:
Viper1GJ (10-12-2020)

The following users liked this post:
bonefishfool (10-12-2020)
10-12-2020, 04:44 PM
#789
Thread Starter
My Feedback: (20)
Thanks Tom, Glenn, but I'm a long way from Top Gun work. I'll need somebody to make a cockpit for this thing after test flights in the primer. Then I will think about scale stuff. I'm still worried about getting the gear to track straight and then fold into the wing!
10-12-2020, 05:04 PM
#790
Thread Starter
My Feedback: (20)
Air and gear update
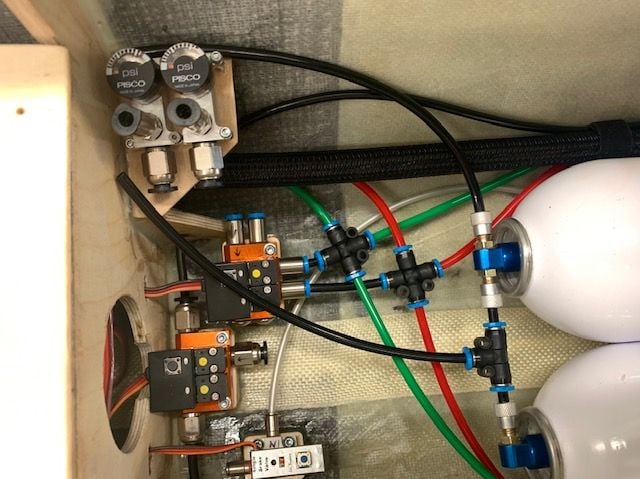
I got the 4 way 4mm Festo connectors in from Aeropanda today. Fast shipping. Thanks. These really cleaned up the air system install.

I got rid of the zip ties I used on the gear air lines and tied them in place with the waxed lacing cord. Much better and softer on the air lines. It's real hard to find space in this gear for anything extra and I still have to figure out the brake lines and wire for the Mrpm sensor on the left wheel.
This is it for the week. Taking off for the SC Tiger Meet. It's the only jet meet I could get to this year that hasn't been cancelled.
I got the 4 way 4mm Festo connectors in from Aeropanda today. Fast shipping. Thanks. These really cleaned up the air system install.
I got rid of the zip ties I used on the gear air lines and tied them in place with the waxed lacing cord. Much better and softer on the air lines. It's real hard to find space in this gear for anything extra and I still have to figure out the brake lines and wire for the Mrpm sensor on the left wheel.
This is it for the week. Taking off for the SC Tiger Meet. It's the only jet meet I could get to this year that hasn't been cancelled.
The following users liked this post:
CRJDriver (11-14-2020)
10-19-2020, 03:55 PM
#791
Thread Starter
My Feedback: (20)
Had a great time at the SC Tiger Meet. Great flying, great weather, and best of all great friends! Flew the Havoc the last time. It's for sale. I'll be taking out the turbine and radio stuff to use in the F-105.
If anybody is interested here's the link:
https://www.rcuniverse.com/forum/market/11683846
If anybody is interested here's the link:
https://www.rcuniverse.com/forum/market/11683846
10-20-2020, 11:18 AM
#792
My Feedback: (28)
Air and gear update
I got the 4 way 4mm Festo connectors in from Aeropanda today. Fast shipping. Thanks. These really cleaned up the air system install.
I got rid of the zip ties I used on the gear air lines and tied them in place with the waxed lacing cord. Much better and softer on the air lines. It's real hard to find space in this gear for anything extra and I still have to figure out the brake lines and wire for the Mrpm sensor on the left wheel.
This is it for the week. Taking off for the SC Tiger Meet. It's the only jet meet I could get to this year that hasn't been cancelled.
https://www.griplockties.com/
The following users liked this post:
skunkwurk (10-21-2020)
10-20-2020, 05:17 PM
#793
Thread Starter
My Feedback: (20)
You can try these zip ties....
https://www.griplockties.com/
https://www.griplockties.com/
Gary
10-26-2020, 05:19 PM
#794
Thread Starter
My Feedback: (20)
Update
Nothing done since SC Tiger meet return. Been busy with house chores and other RC projects. Havoc sale is pending. I got the K-320 and radio out and its ready for install and setup in the F-105. Went to fly Saturday to help a buddy with waiver training and crashed my foamy Cessna 170 due to a plastic clevis fail on elevator. Repaired it yesterday with a 4-40 metal clevis and finished today. It looks like Frankenstein but is all glued back together and ready to go again.
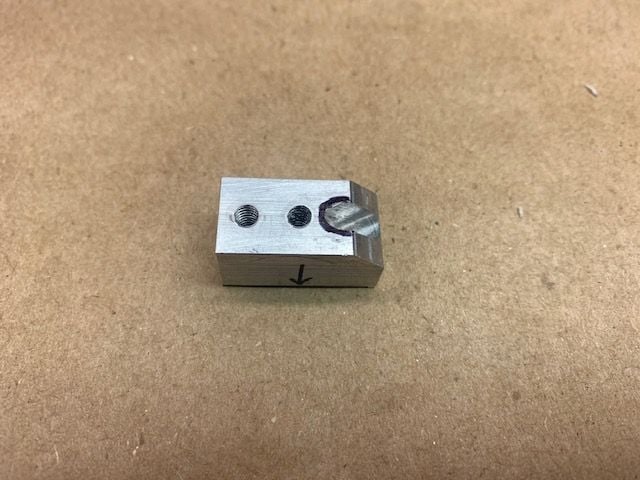
I got these in the mail Saturday.
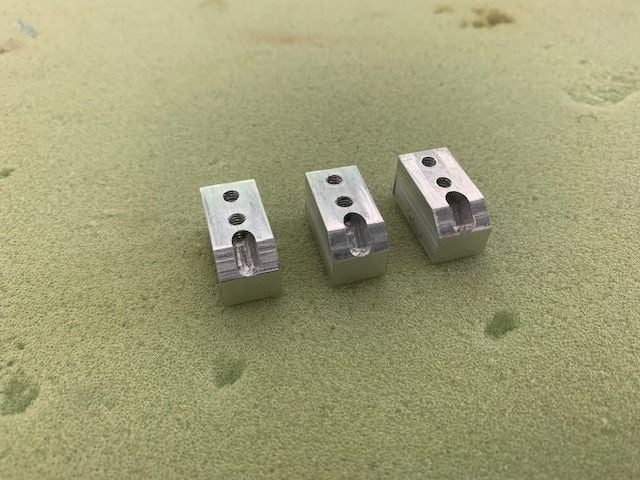
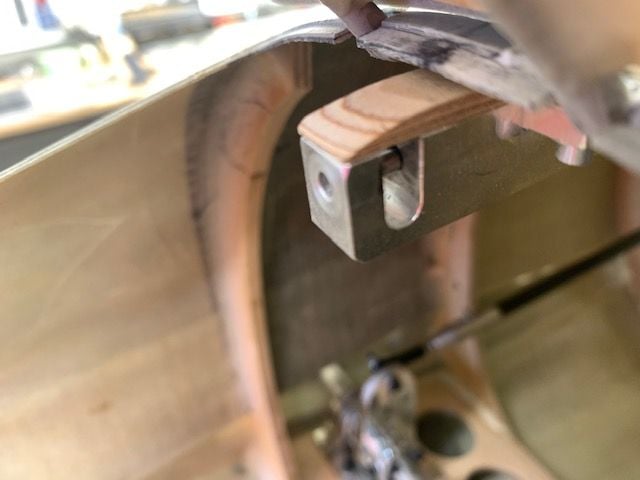
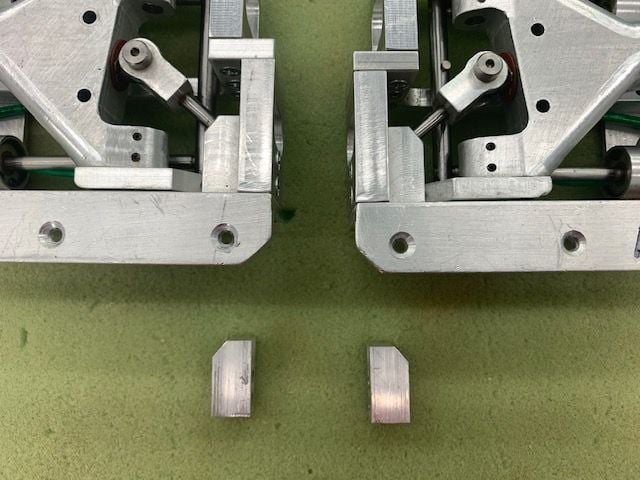
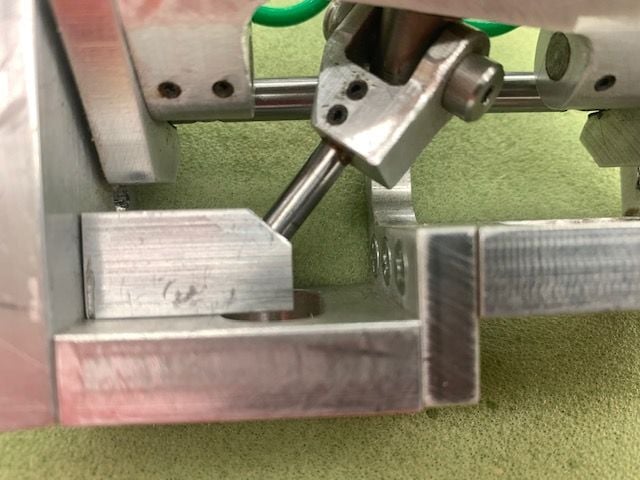
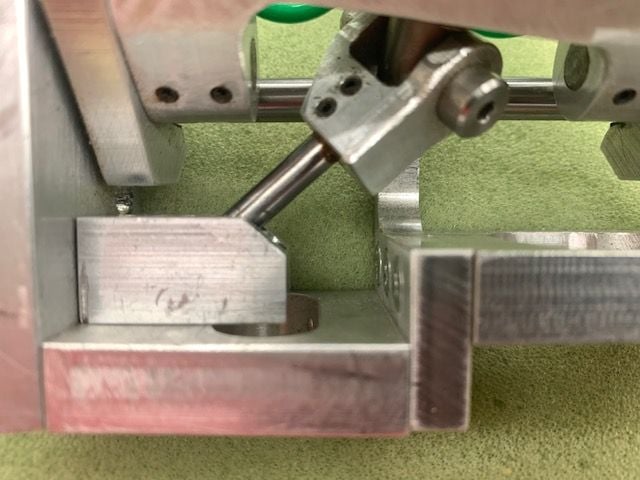
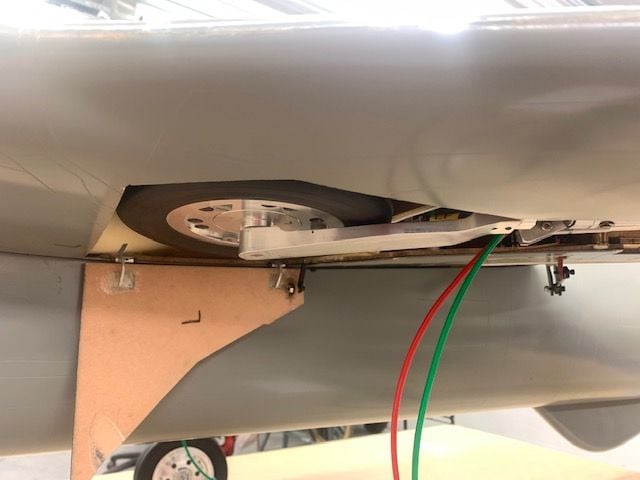
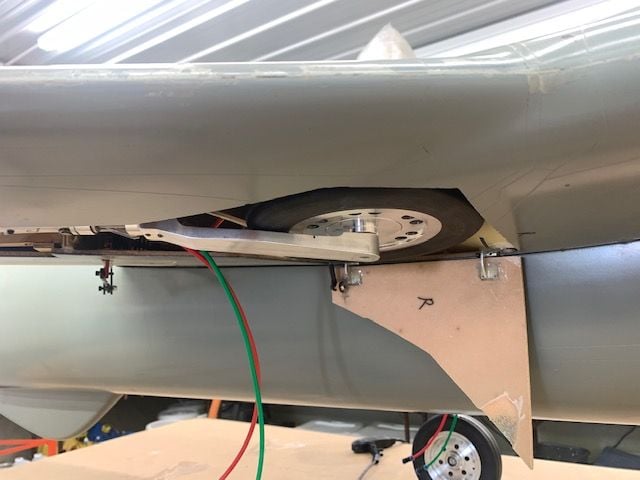
These are the F-105 gear mod parts from Larry. These parts control the rotation angle during retraction and extension. Larry made a slot instead of a fixed hole in the angled corner that will allow me to find the proper angle and epoxy the pin in the correct angle. Then he can machine a part with the hole in the proper place. Hopefully this will fix the tow in angle when extended and rotate to fit into the wheel well when retracted.
The block is shown here in the lower left corner of the gear truss. The angle of the rotating pin controls the rotation of the lower strut during retraction and extension of the gear strut. This one is off about 6 degrees when extended. The pin must be in the block about 6 degrees clockwise from its current position to work correctly. Hopefully I can set the proper angle in the new ones and then Larry can make more with the proper angle. This is the last major issue I have other than just getting it all done. Thanks Larry for the help.
Nothing done since SC Tiger meet return. Been busy with house chores and other RC projects. Havoc sale is pending. I got the K-320 and radio out and its ready for install and setup in the F-105. Went to fly Saturday to help a buddy with waiver training and crashed my foamy Cessna 170 due to a plastic clevis fail on elevator. Repaired it yesterday with a 4-40 metal clevis and finished today. It looks like Frankenstein but is all glued back together and ready to go again.
I got these in the mail Saturday.
These are the F-105 gear mod parts from Larry. These parts control the rotation angle during retraction and extension. Larry made a slot instead of a fixed hole in the angled corner that will allow me to find the proper angle and epoxy the pin in the correct angle. Then he can machine a part with the hole in the proper place. Hopefully this will fix the tow in angle when extended and rotate to fit into the wheel well when retracted.
The block is shown here in the lower left corner of the gear truss. The angle of the rotating pin controls the rotation of the lower strut during retraction and extension of the gear strut. This one is off about 6 degrees when extended. The pin must be in the block about 6 degrees clockwise from its current position to work correctly. Hopefully I can set the proper angle in the new ones and then Larry can make more with the proper angle. This is the last major issue I have other than just getting it all done. Thanks Larry for the help.
Last edited by Viper1GJ; 10-26-2020 at 05:23 PM.
11-21-2020, 03:56 PM
#795
Thread Starter
My Feedback: (20)
Its been about a month since I posted. Several folks asked about the delay. I got sidetracked by another project after I sold my Havoc. I saw a Freewing Mig-29 EDF fly at the SC Tiger Meet and decided I needed to convert one to turbine. So for the last couple of weeks I got it going and it flies great. It's all done now and I plan to get back to the F-105 next week.
Build thread here: Freewing Mig 29 EDF to Turbine Conversion

Build thread here: Freewing Mig 29 EDF to Turbine Conversion
Last edited by Viper1GJ; 11-21-2020 at 03:58 PM.
11-23-2020, 03:16 PM
#796
Thread Starter
My Feedback: (20)
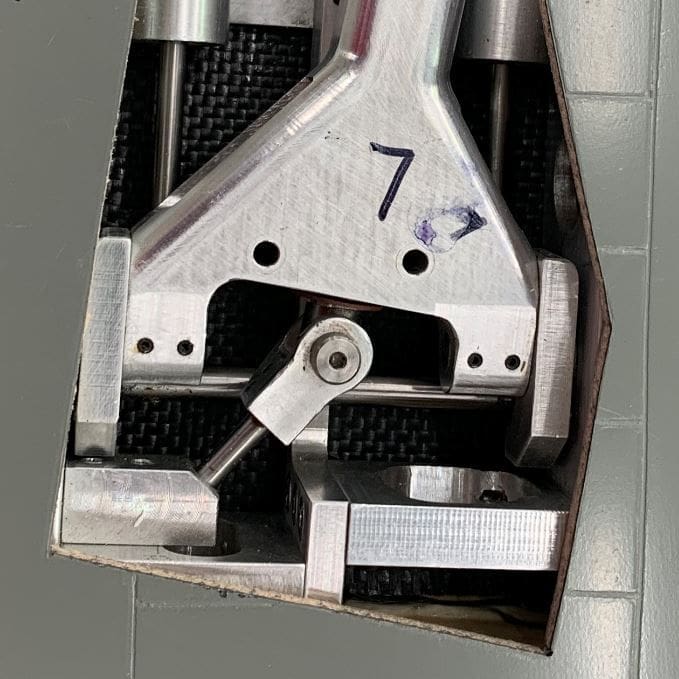
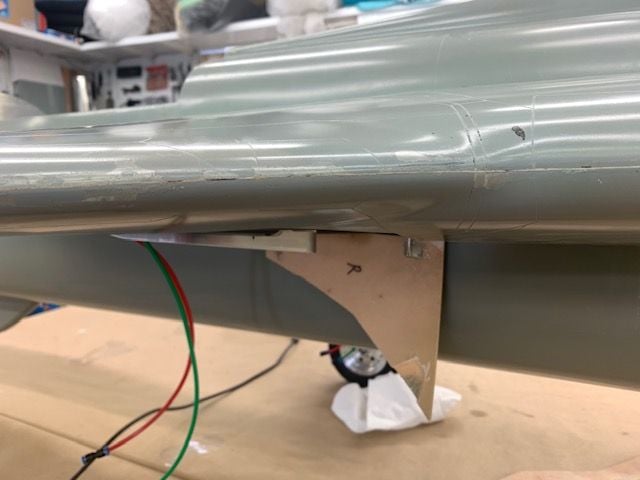
Finally got back to F-105 project this week. I got the new gear rotation control blocks Larry sent me last month installed in the main gears.
The replacements blocks are shown before install.
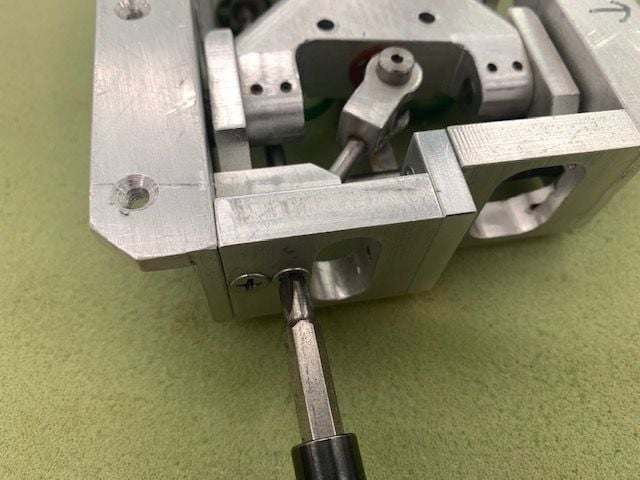
The blocks are mounted with two countersunk screws
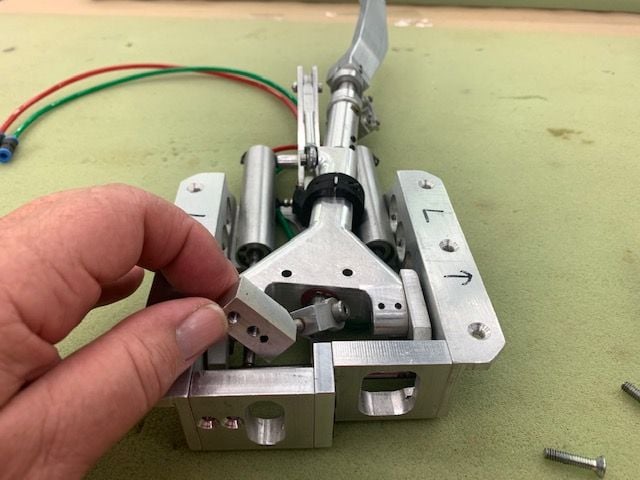
Removing the old block. You can see how rotation of the pin in the block rotates the lower strut. The angle of the pin when extended controls the tow angle of the wheel and when retracted it controls the rotation of the wheel into the gear well. The first blocks were about 5-6 degrees off when extended. When I fixed the tow angle it caused the wheel not to go inside the gear well. Hopefully getting the correct angle will solve both problems.
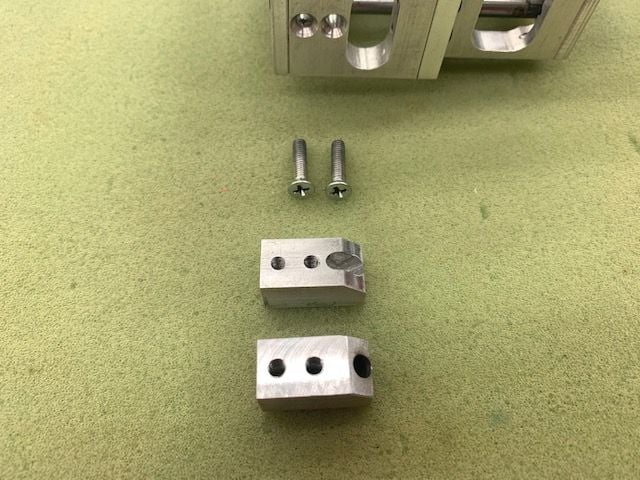
The new block is for testing and has a slot instead of a hole to allow adjustment of the lower strut angle.
New block installed showing pin in lowest position.
Pin shown here in the highest position. The only way to find the correct angle is to assemble the jet on the gear and set and test for the proper angle. Once that is determined I will apply a release agent to the pin and epoxy it in place. Then I can send it back to Larry to make a final block with the correct angle drilled in.
The replacements blocks are shown before install.
The blocks are mounted with two countersunk screws
Removing the old block. You can see how rotation of the pin in the block rotates the lower strut. The angle of the pin when extended controls the tow angle of the wheel and when retracted it controls the rotation of the wheel into the gear well. The first blocks were about 5-6 degrees off when extended. When I fixed the tow angle it caused the wheel not to go inside the gear well. Hopefully getting the correct angle will solve both problems.
The new block is for testing and has a slot instead of a hole to allow adjustment of the lower strut angle.
New block installed showing pin in lowest position.
Pin shown here in the highest position. The only way to find the correct angle is to assemble the jet on the gear and set and test for the proper angle. Once that is determined I will apply a release agent to the pin and epoxy it in place. Then I can send it back to Larry to make a final block with the correct angle drilled in.
12-17-2020, 05:08 PM
#797
Thread Starter
My Feedback: (20)
Main Landing gear alignment...again.
I finally got caught up on other projects and chores and got back to the F-105 again. The objective was to test the main gear alignment with the new rotation blocks I got from Larry (shown above) installed.
The first task was to get the jet up on the gear and mark lines parallel to the table edge under the main wheels to set the alignment.
The very next thing that happened was a disaster. I did not get the nose gear locked down and it folded up and crushed the nose gear doors. The right door hinges broke off as shown. AAAARRRRGGGGHHH!!!! Now I have to fix the door hinges somehow. I took them off for the picture here.

I got the lines marked on the table. Then I jacked up the gear with the boxes so I could swing it to test the rotation and set the alignment. I had to use the air gun to get the cylinders to lock in up and down positions. I set the lower strut and wheel to track straight with the upper strut rotated fully counter clockwise in the slot of the block.
This is the rotation pin fully seated in the new block shown all the way to the left. This is probably 5-6 degrees farther that the original part allowed which resulted in the tow in before. Now the main wheel is straight. After testing the rotation on retraction the main wheel will fit into the wing wheel well.

Next I had to figure out a way to mark the set screw position on the upper strut pin. I sanded a fine Sharpie marker to fit into the set screw hole.
It finally allowed the marker to get in deep enough to hit the pin

The pin was marked and some guide lines made to help with keeping the grinding wheel in position

A double layer grinding disc was used to make the flats on the pin.

Strut replaced and set screw centers remarked to check how I did. I was happy as the centers seemed to be on the flat spots.
Lower strut replaced and retraction rotation tested. I was pleased that the wheel fit into the wheel well
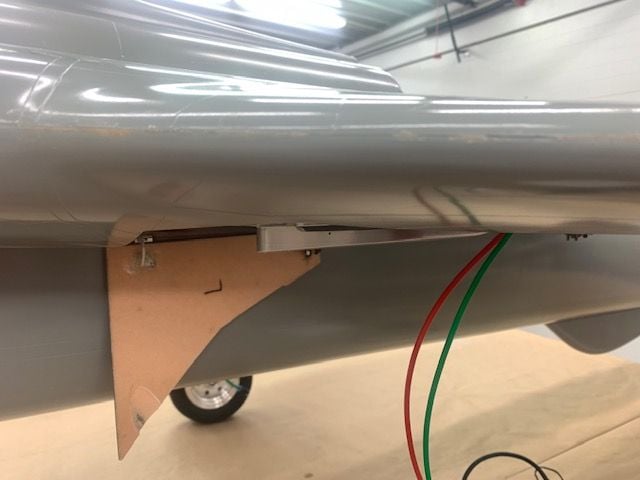
However the lower strut still hangs out too low. The only option is to remake the gear doors to cover the bump. But its way better than it was before.
Main wheel is now aligned. Good enough. This was the main show stopper for the build starting from the very beginning of the project. The next big question from the beginning was and still is... if there will be enough internal air to raise the main gears in the wind. They have to retract forward and rotate and the gear door and wheel become big wind catchers with lots of drag. We will see. The saga continues...
I finally got caught up on other projects and chores and got back to the F-105 again. The objective was to test the main gear alignment with the new rotation blocks I got from Larry (shown above) installed.
The first task was to get the jet up on the gear and mark lines parallel to the table edge under the main wheels to set the alignment.
The very next thing that happened was a disaster. I did not get the nose gear locked down and it folded up and crushed the nose gear doors. The right door hinges broke off as shown. AAAARRRRGGGGHHH!!!! Now I have to fix the door hinges somehow. I took them off for the picture here.
I got the lines marked on the table. Then I jacked up the gear with the boxes so I could swing it to test the rotation and set the alignment. I had to use the air gun to get the cylinders to lock in up and down positions. I set the lower strut and wheel to track straight with the upper strut rotated fully counter clockwise in the slot of the block.
This is the rotation pin fully seated in the new block shown all the way to the left. This is probably 5-6 degrees farther that the original part allowed which resulted in the tow in before. Now the main wheel is straight. After testing the rotation on retraction the main wheel will fit into the wing wheel well.
Next I had to figure out a way to mark the set screw position on the upper strut pin. I sanded a fine Sharpie marker to fit into the set screw hole.
It finally allowed the marker to get in deep enough to hit the pin
The pin was marked and some guide lines made to help with keeping the grinding wheel in position
A double layer grinding disc was used to make the flats on the pin.
Strut replaced and set screw centers remarked to check how I did. I was happy as the centers seemed to be on the flat spots.
Lower strut replaced and retraction rotation tested. I was pleased that the wheel fit into the wheel well
However the lower strut still hangs out too low. The only option is to remake the gear doors to cover the bump. But its way better than it was before.
Main wheel is now aligned. Good enough. This was the main show stopper for the build starting from the very beginning of the project. The next big question from the beginning was and still is... if there will be enough internal air to raise the main gears in the wind. They have to retract forward and rotate and the gear door and wheel become big wind catchers with lots of drag. We will see. The saga continues...
Last edited by Viper1GJ; 12-17-2020 at 05:12 PM.
12-18-2020, 09:25 AM
#798

Looking good Gary!
i just converted the retracts in my 40% cessna 310 over to 5/32 (4mm) airlines. Even with only using a 1/16� airline between standard nipple air tanks, the landing gear is extremely violent in retraction and extension, so much so that slowing them down is now the problem. Considering the struts are 18� long and about 2lbs of mass at the axle, its pretty impressive.
If your setup performs anything like mine, i think you will be fine.
12-18-2020, 05:16 PM
#799
Thread Starter
My Feedback: (20)
Hi Thomas,
Using the shop air gun into the festo fittings they smash up and down. Don't get your fingers in the way. I have yet to operate all of them together through the aircraft valves and fittings so it will be interesting to see how that works. Hopefully soon.
Thanks,
Gary
Using the shop air gun into the festo fittings they smash up and down. Don't get your fingers in the way. I have yet to operate all of them together through the aircraft valves and fittings so it will be interesting to see how that works. Hopefully soon.
Thanks,
Gary
12-18-2020, 05:28 PM
#800
Thread Starter
My Feedback: (20)
Main gear alignment... the other side
Left side wheel aligned and set screws marked. Flats ground in pin and reset.
Left wheel now goes inside wing
Same as left side the right strut still hangs out of the wing gear well
Wheels aligned, it rolls better now.
The rotation block marked where the hole need to be drilled. I am sending this part back to Larry who will make a final version.